About 35 years ago, I had occasion to meet a most wonderful person – a Catholic nun named Sister Joyce Rupp – through my work at a local television station. During our lengthy conversation, she gave me a copy of a book she had written called Fresh Bread. The book is a lovely combination of poetry, essays, journaling prompts, and suggested verses for daily prayer, organized into the months of the year.
The theme in this book for the month of December has always stuck with me: it is about nests. From a Christian perspective, it is specifically about preparing a nest in one’s heart, making a warm and welcoming place for Christ to dwell. Here is the introduction to this theme, from Fresh Bread by Sister Joyce Rupp, OSM:
If you look high into the trees on December days (you) can see little bunches of nests everywhere. They remind me of Advent. Instead of getting a nest ready that will be round and welcoming for an egg and the future young life, I am getting a Christ-home ready within my life. I am trying to prepare a dwelling place for the Lord, a warm, well-hollowed, hospitable place where the life of my God will deepen and mature in me... Whatever the kind of nest, or wherever they are placed, they are hollowed as a dwelling place to receive the gift of life.
I am very private about my faith, but even from a broader perspective this notion of nests and nesting, of making a more welcoming place within ourselves, resonates with me for a few reasons.
First, and perhaps most overtly, we are nesting in our homes – decorating for the holidays, creating warm and comforting meals, pulling the fuzzy throw-blankets tighter around us. We are making our physical space more comfortable, more hollowed-out, more hospitable for our own existence and for the friends and family we will welcome at this festive time of year.
More figuratively, during the Christmas season, we all seem to become oh-so-slightly better people: a little kinder, a little more compassionate, a little more generous. We are “nesting internally,” in a sense, making our hearts a bit more hospitable toward our fellow man.
It’s also important, I think, to make our inner nest a more welcoming place for ourselves: cut ourselves some slack, show ourselves more grace, allow room to make mistakes and not beat ourselves up over them. In other words, we deserve to dwell a little more comfortably – to feel more safe and nurtured – in our own heart-nest.
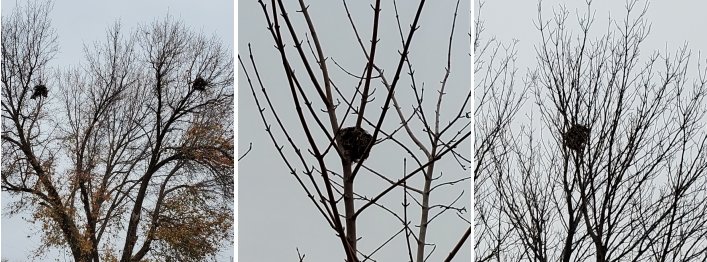
I like to think that perhaps we are focusing more on these inner nests because – as Rupp states in her book – actual nests are so much more visible in Winter: they are easily spotted in the branches of the bare trees, so perhaps are more top-of-mind figuratively (spiritually) as well as physically.
The questions I always come back to when pondering December (and Advent) as a nesting season are these: how ready is the nest of my heart? How can I make it more welcoming? Can I make room among the detritus that invariably finds its way into the structure of my nest (emotions, selfishness, personal baggage, etc.) to let in a bit of light and grace, and make a warm and welcoming space for myself and others?
And perhaps most importantly – what can I do to ensure that the nest I am making is strong enough, warm enough, and hollowed-out enough, to remain a welcoming place throughout the coming year?
What do you think about the concept of a heart-nest? Do you have specific ways you nurture your own heart-nest, spiritually or otherwise? I would love to know!
(If you are interested in reading Fresh Bread, you can find it here on Amazon. Please note: the preceding is an Amazon affiliate link. If you use my link to purchase the book, it costs you nothing extra but I do earn a small commission. I’ll be donating any commissions from this book to a local charity.)