Sometimes, it’s enough to be pretty

Nineteenth century designer William Morris famously said, “Have nothing in your houses that you do not know to be beautiful or believe to be useful.”

I’ve tried to follow this advice over the years – it has guided many a “keep or toss” decision when I am in full purge mode. Of course, best case scenario is that an object is both useful and beautiful  – but this isn’t always possible. I’ve found that most often, objects err on the side of being useful. But occasionally a piece comes along that is just simply lovely for the sake of being lovely. The item I’m sharing today has undergone quite a transformation. Here’s what I started with:

Philco radio set | Vintage Floral Cottage

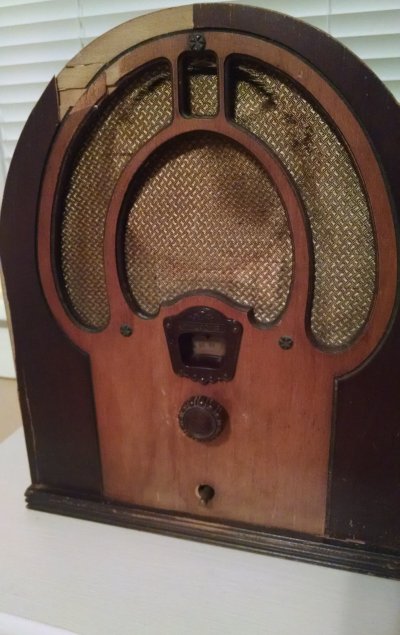
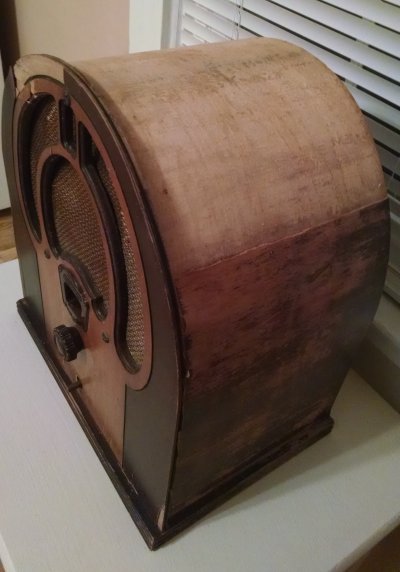
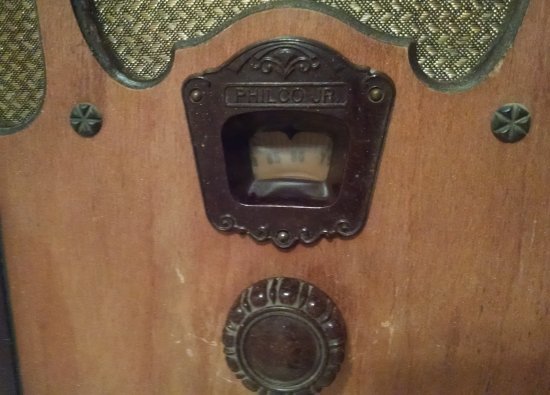
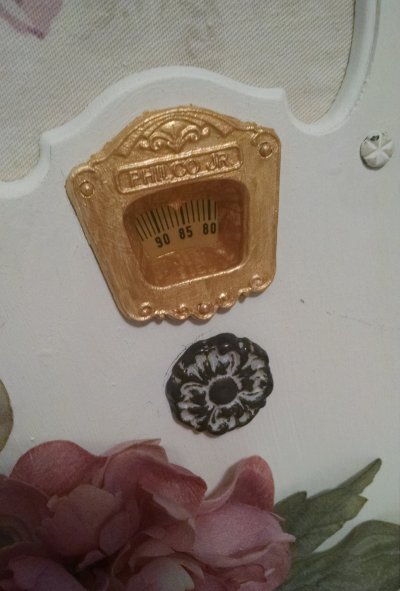
This is a 1932 Philco Model 80 cathedral-style tabletop radio, nicknamed the “Junior.” Although in its day it was beautiful and useful (and rather amazing, given its purpose), it had long since ceased to be either one: it was completely roached, as they say, when I acquired it at an auction last summer, and my $5 winning bid reflected the fact that literally no one else wanted it. Although the cabinet was – to me, anyway – unsalvageable with huge chunks of missing veneer, it had some great details such as the design of the speaker windows, the bakelite tuning knob and the insert bearing the Philco name just above the frequency selection window.


Philco radio set | Vintage Floral Cottage

Philco radio set | Vintage Floral Cottage

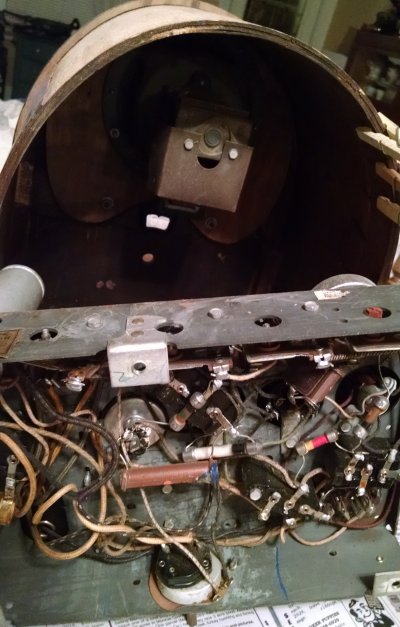
These were known in their day as “radio sets” because they contained groupings (sets) of glass tubes that facilitated the reception and tuning of the various stations. For early radio enthusiasts, any casing surrounding a set of tubes was sort of incidental to the tubes themselves, which were the real magic behind this early medium of mass communication.

Philco radio set | Vintage Floral Cottage

Philco radio set | Vintage Floral Cottage

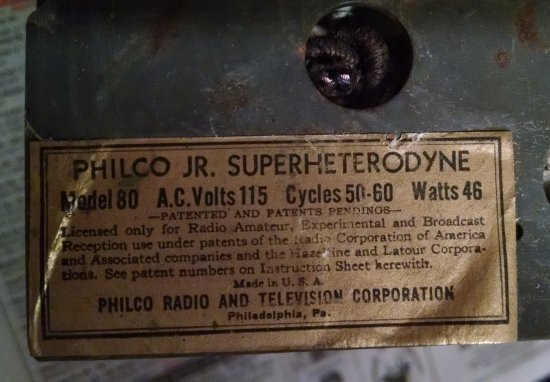
In some cases, elaborate pieces of furniture were designed around the tube set and of course were very expensive. In this case, the Junior was intended to be Philco’s “loss leader,” advertised at a very low price to draw people into the store where they might be enticed to purchase a more expensive model. However, this was after all the Great Depression and the strategy sort of backfired in a good way, as it became one of Philco’s best-selling products ever at just $18.75 per unit.

Philco radio set | Vintage Floral Cottage

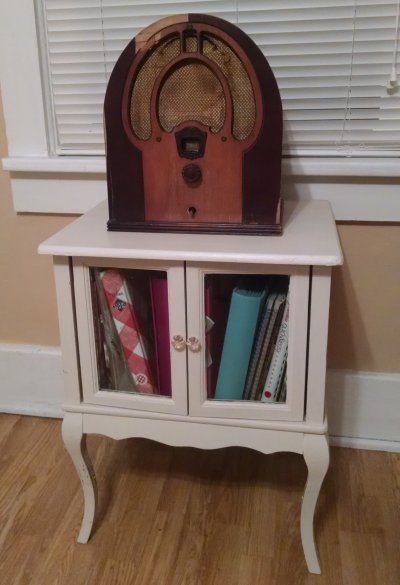
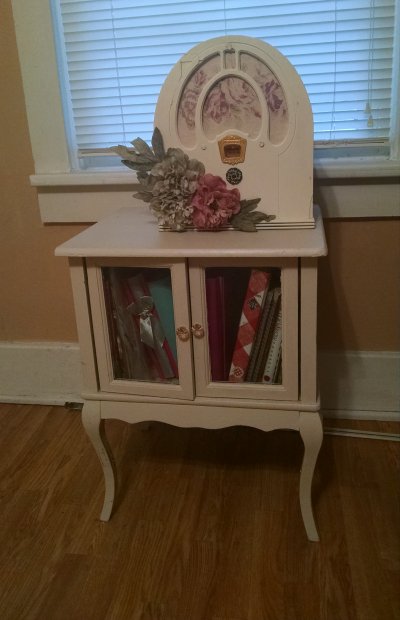
My vision for this was really just to paint it white and do something a little different with the speaker windows. But once I got to that point, I realized it needed something more to be worthy as a purely decorative object. I didn’t take a lot of in-process pictures, but here is what I created using all craft stash items (no new items purchased!) – no longer functional, but just lovely for the sake of being lovely.

Philco radio set | Vintage Floral Cottage

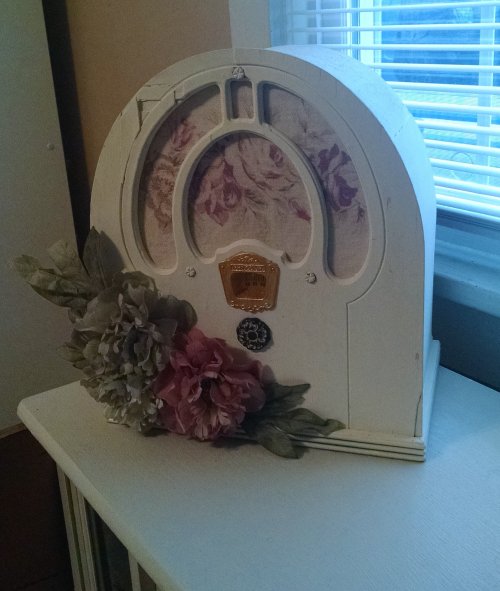
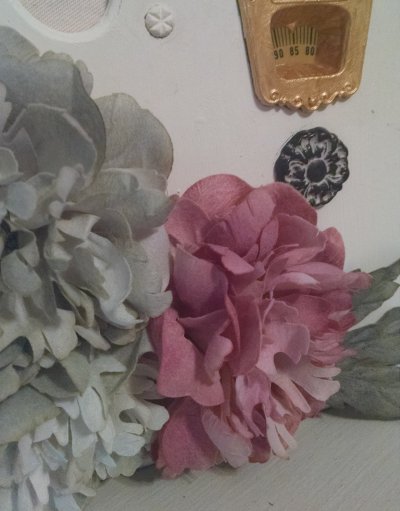
I began by removing all of the guts – the wires, speakers, tubes, etc. and giving the inside of the case a thorough cleaning. I gave it a couple coats of white matte-finish spray paint, then also painted a coat of off-white chalk paint. I painted the frequency window insert with some shimmery gold craft paint. I kept the bakelite knob, which I’ll try to sell to a radio restoration expert on Ebay, and replaced it with a piece of floral-themed hardware off an old dresser.

Philco radio set | Vintage Floral Cottage

I attached a few silk flowers in muted dusty tones using hot glue.

Philco radio set | Vintage Floral Cottage

For the speaker window, I had Greg cut out a thin wooden shape that would fit into the back of the case. Marked and drilled the holes where the mounting screws would go to hold it to the case. I covered this with a thin piece of foam for padding (not sure why – lol – it just seemed better somehow than a piece of wood covered in fabric) then topped the foam with a piece of fabric from my stash that fit the color scheme of the silk flowers. I mounted the new fabric-covered insert into the back of the case and used the decorative mounting screws to hold it in place.

Philco radio set | Vintage Floral Cottage

Philco radio set | Vintage Floral Cottage

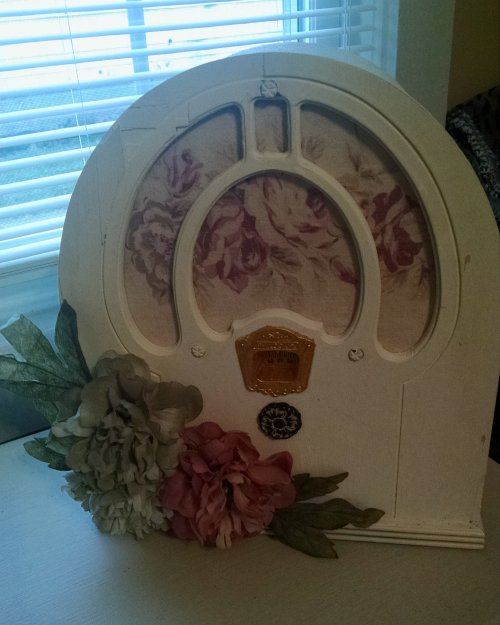
There is one more step I’d like to take with this, which would elevate it back into the realm of being useful as well as lovely. But I don’t have all those elements gathered just yet, and I don’t want to describe it in case that might jinx my success when I do attempt it… so for now it’s just “ars gratia artis” (“art for art’s sake”) sitting atop my little cookbook storage cabinet. I love how the faded fabric and muted tones of the silk flowers suggest a bygone era, just like the radio set itself.

Philco radio set | Vintage Floral Cottage


Posted in DIY & Crafts | Leave a comment

My new source for fresh flowers

Do you ever want to just kick yourself for letting your preconceived notions get in the way of discovering something new? I swear I could start a whole new blog category just for these types of forehead-smacking moments.

So recently I was reading Courtney’s advice for acquiring inexpensive fresh flowers on her beautiful blog, French Country Cottage. It’s seriously like she read my mind. I mean, her blog is FULL of fresh flowers all the time, and I had even considered asking her, where do you get all the amazing fresh flowers? And more importantly, how can you possibly afford them? And within a week of my wondering, this post pops up hinting that Trader Joe’s has a decent fresh-flower market.

Trader Joe’s??

Now I knew of Trader Joe’s before I read Courtney’s post… There’s one on my to-and-from-work route. It’s been there for at least two years, probably longer. One of those over-priced health food markets, is what I assumed it was, passing by it every day but never stopping in, because why on earth would I set foot in a health food market, the absolute least likely place to ever find Diet Coke on sale?

Well I decided to finally stop in solely to check out the flowers, and I’m so glad I did! Now I don’t pretend that I’m suddenly in “TJ’s” target market… Although they would love me if I was, it’s definitely a store for foodies and honestly that’s just not me.

Trader Joe's Flowers | Vintage Floral Cottage

But their fresh flower market is indeed wonderful – and inexpensive! I picked up two nice-sized bouquets of purple daisies, deep purple alstroemeria, and green mini-hydrangeas for just $3.99 each, plus two bunches of ready-to-bloom yellow daffodils for just $1.49 per bunch.

At my usual grocery store, the $3.99 bouquets would easily be $8.99 or more. I’ve never seen them have bunches of daffodils, so I can’t compare, but they were definitely a no-brainer.

Trader Joe's daffodils |Vintage Floral Cottage

As for the other groceries, the store is largely devoted to their own painstakingly sourced house brand, natural instead of artificial ingredients, and probably a weird vegetable or two. I promise to check it out more thoroughly on next week’s fresh flower run!

Posted in Decorating | Leave a comment

Coffee station DIY: spinning rack with mugs

Recently at work our maintenance team gifted me with a small empty wooden cable or wire spool. (Do they know me or what!?)

Coffee station DIY | Vintage Floral Cottage

I had seen so many examples of the larger spools being repurposed into tables, and I knew there must be a use for this size too. A quick review of Pinterest yielded several good ideas, but my favorite was the creation of a countertop coffee station. It seemed simple enough, and after some planning I decided my coffee station needed to meet the following criteria:

  • Be as compact as possible to save countertop space.
  • Spin for easy access to all the cups.
  • Decoratively corral supplies on top so they would not “fly off” while spinning.
  • Have a “vintage cottage kitchen” look.

Here are the steps I used to complete my coffee station!

I removed the two full-length bolts that held the cardboard center tube in place, and retained those for a future project. I pulled the tube loose easily from the top and bottom wooden pieces.


Coffee station DIY | Vintage Floral Cottage

Using spray adhesive, I wrapped the tube in a carefully measured and cut piece of textured wallpaper that I had on hand.

Coffee station DIY | Vintage Floral Cottage

You could also paint the center tube, cover it in Contact paper, wrap it in nautical-style rope, or even wrap it in a mosaic tile sheet finished with grout – whatever suits the look you’re going for. I trimmed the excess off the ends so the paper was flush with the cardboard tube.

I sanded both sides of each of the wood pieces, and painted both pieces top and bottom with three coats of leftover white paint.

Coffee station DIY | Vintage Floral Cottage

I used my E-6000 glue to attach a spinning spice rack to the underside of the bottom piece of wood. Mine was already white – you might have to paint yours depending on what color you need it to be.

Coffee station DIY | Vintage Floral Cottage

I attached white screw-in cup hooks to the underside of the wooden top, using my trusty “eyeball-it” method and a stand-in stunt mug to figure out the spacing of the hooks.

Coffee station DIY | Vintage Floral Cottage

The key here is to make sure the cups don’t touch or clink together, so be sure to use your largest cup as your stunt mug. I set my hooks far enough in so the cups would hang under the top edge, as this would save space. I also had to experiment with a variety of hook sizes so that the hook would fit my cup handles but not drop the cup so far down that it touched the wood base. (I now have a lifetime supply of cup hooks of varying sizes and finishes that were used in testing!)

The top also needed to corral supplies such as sugar and creamer packets. For this purpose I attached a decorative basket to the flat surface of the top, using small dots of hot glue around the perimeter of the basket bottom. This could also be a small wooden box painted to match, a small bin, or any small container that fits the surface and your design theme.

Coffee station DIY | Vintage Floral Cottage
With the individual sections now complete, I used my E-6000 glue to re-attach the center tube to the wooden top and bottom sections. I used books as weights to hold everything solidly in place as it dried.

Coffee station DIY | Vintage Floral Cottage

Coffee station DIY | Vintage Floral Cottage

Once it was dry, I simply stocked my coffee station with mugs, coffee, and other supplies. It sits neatly under the kitchen cabinetry and keeps everything within easy reach.

Coffee station DIY | Vintage Floral Cottage

Coffee station DIY | Vintage Floral Cottage

This piece could also be used for tea or hot cocoa supplies – customize for your beverage of choice!

Coffee station DIY | Vintage Floral Cottage

Coffee station DIY | Vintage Floral Cottage

I’ll be sharing my repurposed wooden spool coffee station at these fun DIY parties.

Coffee station DIY | Vintage Floral Cottage

Posted in DIY & Crafts | Leave a comment

Your social painting: why would you NOT keep it?

A gal on Twitter whom I’ve followed for some time, who is a loving mom and an extremely creative homemaker (among many other accomplishments), recently posed this question:

Painting Tweet 1 | VFC Style

Having attended one social painting class (and having kept my painting, and having hung it in my house), I couldn’t help but feel there was a bit of friendly ribbing going on here. Especially with the word art in quotation marks. Why is it “art” and not just art? Because it isn’t really art? Why not?

But it was her follow-up comment that really got me thinking:

Social painting tweet | VFCstyle.com


Here was my immediate, unfiltered response:

“Well, you probably have your KIDS’ random mediocre art hanging all over your house – so why is yours any less worthy?”

Now please understand, that’s not an attack on her kids – or anyone’s kids. I proudly displayed my daughter’s projects and pictures on the fridge and elsewhere, all throughout her childhood.

Kids’ art is precious. It is pure, free, raw creative expression, and its innocence is precisely why we celebrate it.

But it also shows, for the most part, a complete lack of technical perfection. It lacks an understanding of the principles of design. It’s random. And as art, it’s mediocre – at best – except for the beautiful fact of who created it. Which again, is what makes it completely worthy of being put on display!

So why does our kids’ art deserve to be posted on the fridge, despite its imperfections, but not our own? What is it about being an adult that makes you think your art – lacking the same perfection as that created by your children – is any less precious? Any less worthy?

Pumpkin painting | VFC Style

The results of my efforts at a social painting class, Fall 2016.

One of the problems in our society is that for so many of us, our creative self-expression gets squeezed out of our being by the time we get through our mandatory formal education. We are trained to seek perfection, correctness in our methods, and skill in our results. This follows us throughout our lives, where we are expected to achieve some standard of perfection in all pursuits: professional, athletic, creative, and on and on.

And for some reason, we feel ashamed when our work does not show the level of perfection we think it should have now that we are adults. Seriously – how many times have you shown something you made to someone else, but actually apologized for its imperfections before letting them see it?

And perhaps worse, how many times have you denied yourself an opportunity to express your creativity because you just knew it wasn’t going “turn out right”?

This is what happens when your creative self-expression is stifled over a period of time – you call your painting a piece of “random mediocre art,” and you hide it away, destroy it, or at the very least, apologize for it. I do it to myself! I’ve blogged about it with comments like “I’m a trained monkey when it comes to painting” or “I don’t have the artistic gene.”

Painted hook rack | VFC Style

Hand-painted hook rack – flowers arranged and painted by yours truly… imperfectly.

Why do I do this? Why does anyone do this? Because it’s part of that figurative baggage we carry as grown-ups: the notion that somehow, our creative work is not good enough because it isn’t perfect.

Now I don’t think that my friend on Twitter intended to suggest that she is afraid to express herself creatively. Her blog is filled with her many successes in decorating, home making, crafting, cooking, and more. But I know there are people who are afraid of this very thing, and it saddens me to think that this level of self-censorship exists to the extent that it keeps people from displaying their own creative efforts. It saddens me that a person would rather purchase a mass-produced piece of wall art at a big-box decor store, rather than take a chance and create their own piece.

One thing that my love of all things antique and vintage has reinforced for me is that there is value in imperfection. I love things that are vintage, precisely because of the fading, the dings, the dents, the chipping paint, the worn edges. These elements tell the story, and give the piece its sense of history.

I think that this appreciation and reverence for imperfection needs to extend to our own creative efforts. We need to celebrate our creativity, make things we feel like making, take pride in them, and stop apologizing when they don’t look like they were done by a master.

Because honestly, only a few people get to be masters of any endeavor. That doesn’t mean the rest of us should extinguish – or even apologize for – our creative, imperfect light.

Posted in Decorating, Thinky Thoughts | Leave a comment

Farmhouse step-back cabinet built with love

My sweet boyfriend Greg (if you are 54 years old do you still get to use the word “boyfriend”?) spent many hours recently, building me a piece of furniture that I had been hoping to find at auction for a long time, but just could never get my hands on. It is a primitive-style farmhouse step-back cabinet: two-door enclosed base, with a three-shelf open hutch on top.

Greg hasn’t really built any furniture before, but because we had started to do some small refinishing projects for our booth pieces, we had acquired a radial arm saw and then a table saw. So one day he went to the garage and started building a couple of miniature “barn gates” made of cedar. When he first showed them to me, we talked about aging them and styling as decorative wall pieces to be sold in our antique booth. Then he started talking about maybe building a cabinet around them, and at that point I showed him the inspiration photo below for what I thought it could become.

Primitive hutch | Vintage Floral Cottage

And so, without any plans and just working out of his head with his background in large-scale construction (and NOT – as he likes to claim – in finely detailed finishing work)… he built this:

Primitive hutch | Vintage Floral Cottage

I mean, it’s perfect. So perfect I want to cry. It’s exactly what I was looking for, only better because it’s handmade. The cabinet stands about six feet tall and four feet wide. It’s made primarily out of rough-cut cedar fence pickets and pine two-by’s. The beautiful, naturally aged top on the base is reclaimed barn board.

Primitive hutch | Vintage Floral Cottage

Primitive hutch | Vintage Floral Cottage

The hutch is made of more cedar pickets, pine one- and two-by’s, and pine shelving.

Primitive hutch | Vintage Floral Cottage

In finishing, we experimented with a wood-staining technique where you first paint the wood with black tea, and then vinegar steeped with steel wool to draw out an aged, silvery color. However, for reasons unknown, on this project the aged color was decidedly reddish/brownish/rustish. Here it is part-way through the staining process.

Primitive hutch | Vintage Floral Cottage

Primitive hutch | Vintage Floral Cottage

Primitive hutch | Vintage Floral Cottage

Although it didn’t turn to the silvery color I was anticipating, it allowed me to paint the entire piece white with a dark, aged appearance underneath so that if I chose to manually distress it, the “aged” wood would show through.

Once the aging step was completed, I painted the entire thing in Glidden Premium interior paint in Nano White. It took an entire gallon, two coats overall and in some places, three. I left the barnwood unpainted. Greg then attached the top to the base and we moved the whole thing into place.

Primitive hutch | Vintage Floral Cottage

Primitive hutch | Vintage Floral Cottage

Primitive hutch | Vintage Floral Cottage

I admit, I stayed up until about 3 a.m. fussing and styling with some of my favorite cottage pieces, many of which have been in hiding just waiting for this very piece of furniture.

Primitive hutch | Vintage Floral Cottage

Primitive hutch | Vintage Floral Cottage

Primitive hutch | Vintage Floral Cottage

I can’t even begin to express how impressed and touched I am that this is what he chose to build, and that he seems to love it as much as I do. I’m pretty impressed with him, and I hope he is too!

Primitive hutch | Vintage Floral Cottage

Posted in Decorating, DIY & Crafts | 1 Comment